Two weeks ago, Brian Tippy posted about using Liquid to create intuitive ways for site administrators to seamlessly move between the client-side website and back-end CMS platform for page editing. This is perfect for letting a user know where to edit a particular content block or design element, but we can apply the same concepts in a more macro manner to the structure of the website itself.
What is a sitemap?
A sitemap is simply a listing of pages on a given website arranged in a way that clearly shows the relationships between each page and the others.
One of the most common versions is an XML Sitemap, which is used primarily by search crawlers to index a website for search engines. The other most common version is known as an HTML sitemap (or site index), which is designed to give admins a top-down view of their website and is what we'll be talking about today.
Page Templates
To get you started, we've created page templates for each of our public themes (and Bootstrap framework) that you can paste directly into your existing theme.
Download the Sitemap Starter Kit
Installation Steps
1. Download the sitemap kit via the link above, and unzip the archive.
2. In control panel go to "Website", select the site you wish to modify, and create a new Basic page.
3. Select the HTML file from the sitemap kit that corresponds to your theme.
(e.g. If you're using the "Publish" theme, you'll want to use _publish_sitemap.html)
4. Copy/paste the contents of the _theme_sitemap.html file into the "Template" tab of your new Basic page, entirely replacing the original code.
That's it! Please note that edits done to the page template will not be included in shared themes, so if you're looking to distribute the sitemap through a theme share, your best bet will be to create a partial html template and use the {% include %} tag to render it on the website.
What's included?
Before we look at what pages are on a website, there are some useful links we can include at the top of our sitemap to mirror some of the back-end functionality around adding new pages and navigating within the nation. In particular, links to the Dashboard and People tabs, site settings, and the site broadcaster can save users several steps while managing their website. This section is generated using a combination of site and settings variables, and is displayed like this:
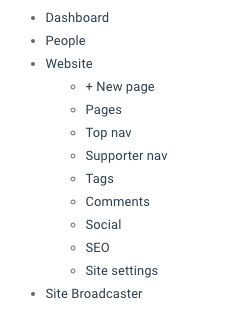
Next, we'll want to display the pages on the website. While this could just be an unordered list of page names, we can use page variables to include page icons to easily identify the pagetype, display links to edit the pages, show the number of subpages with a link to create more, and nest those subpages visually under their parent pages:

Reading left-to-right, we have:
- An icon indicating the page type:
{{ page.icon | icon }} - The name of the page, hyperlinked to the live website:
{{ page.url }} - A 'cog' icon linked to the page's settings tab:
{{ page.admin_edit_url }} - The number of subpages and a link to that page's subpage tab:
{{ page.admin_subpages_url }} - A 'plus' icon to create a new subpage:
{{ page.admin_new_subpage_url }}
The nesting structure is achieved using a combination of {% for %} loops and unordered lists around the site's top navigation pages and their children, in this case up to 6 subpage layers deep. By not closing the parent's <li> before including another <ul> of subpages, we can automatically nest subpages under their parents. This also means that we need to use the child. prefix rather than the page. prefix in our liquid drops.
It's worth mentioning that we've included a "limit:10" on the forloops to prevent more than 10 subpages being displayed at a time, which will preserve the structure of the sitemap when utilizing a lot of Blog Posts or Event pages.

Finally, we'll want to include two keys - one for the page settings/subpages/new subpage buttons:

And one key for the page type icons:

Hiding the sitemap from non-admins
The templates included in the conversion kit all include a check to make sure that the user viewing the page has a permission set that allows them to publish web pages. While this should be sufficient for most users, you may wish to hide the page from non-logged in users or non-admins entirely.
Further customizations
Since the kit includes references to page types that might not be in use depending on what add-ons are enabled in the Nation. As such, you should consider removing some of the links to control panel sections as well as some icons in the page type key.
Beyond that, we encourage you to build on these templates, experiment with the structure and style of your sitemap, and to customize it to fit the specific needs of the client. This could mean anything from breaking out certain page types into their own sections, styling the sitemap and keys to fit their specific branding and layout, or creating a dedicated link in supporter navigation panels or sidebars - get creative!
