This document is designed to provide you with best practices and guidance on how to get your NationBuilder website/campaign up and running, as well as give you information on features that will help you maximize efficiency and success!
Table of Contents
-
- Where to start: Design and build your website
- Call people to action: Create action pages
- Get ready to accept donations: Connect your bank account
- Set up your election
- Build your foundation: Import data
- Prepare for outreach: Connect your email address/socials and create a phone number
- Make outreach easy: Use NationBuilder to help automate the workflow of your campaign
- Build your community: Phone banking and turf cutting for canvassing
- Continue to build your community: Find your leaders
- Go above and beyond: Deepen your community
1. Where to start: Design and build your website
Political websites can cost thousands of dollars to build, but NationBuilder gives you the tools to replicate the pros at a fraction of the price. Designing a website is where you and your team can get the most distracted from your goals. It’s easy to get hung up on a color scheme or on the placement of a button. The reality is, your website shouldn’t be a beautiful billboard, it needs to be an interactive experience that will bring in supporters. You know what’s worse than the wrong color scheme? Having someone out there who wants to volunteer but doesn’t get a call or email when they sign up to door knock for you.
NationBuilder comes with some pre-built responsive themes, meaning they work on multiple devices from laptops to smartphones. But, when you first open them they don’t look like the beautiful demo sites that we display in our public theme gallery. Your website is launched with a generic theme (look) and few “placeholder” pages that are ready for you to edit, these include an about page, events page, contact page, join page, and volunteer page.
To start, decide what you’d like your website to look like. Click on Website > Website name and click on Theme, then Switch to a public theme. Here you will find the pre-built designs that are readily available for you. Once you find one you like, hover over it and click Use Theme (or Demo to preview it).

Now, within the theme you’ve chosen, you can choose a style. Click on Theme > Switch style. Once you find a style you like, hover over it and click Use style.

Awesome, now you’ve selected your site’s overall look. Next, we recommend starting to edit the content on your site. A good place to start is by editing your ‘About’ page.
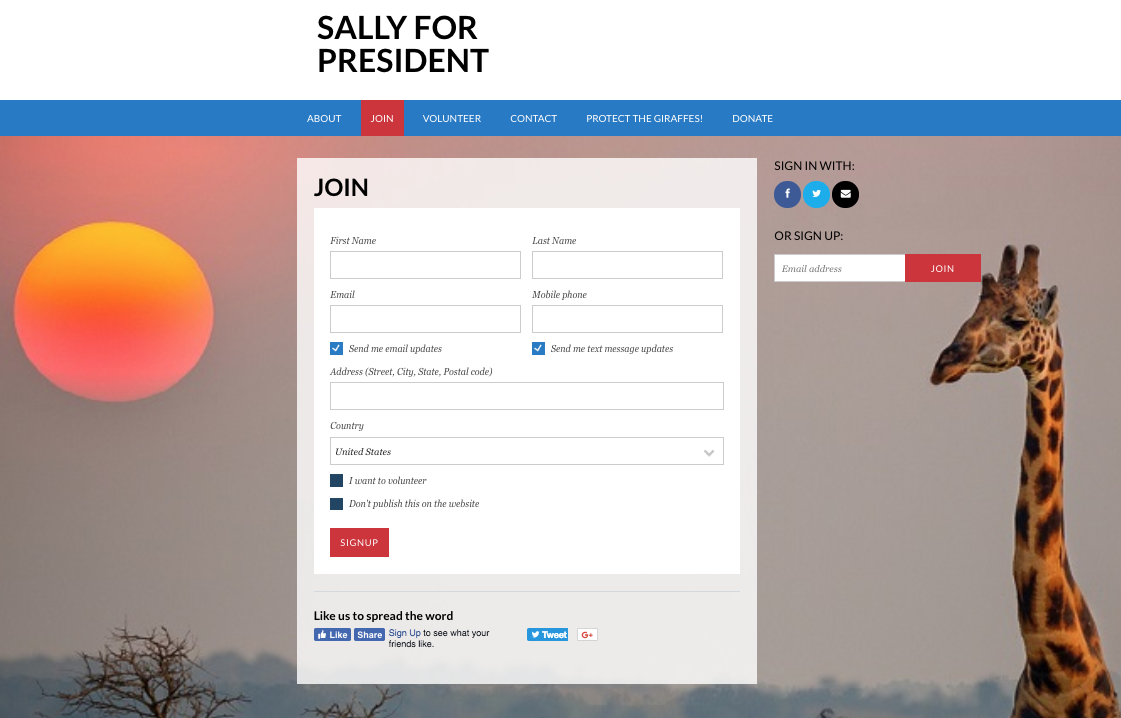
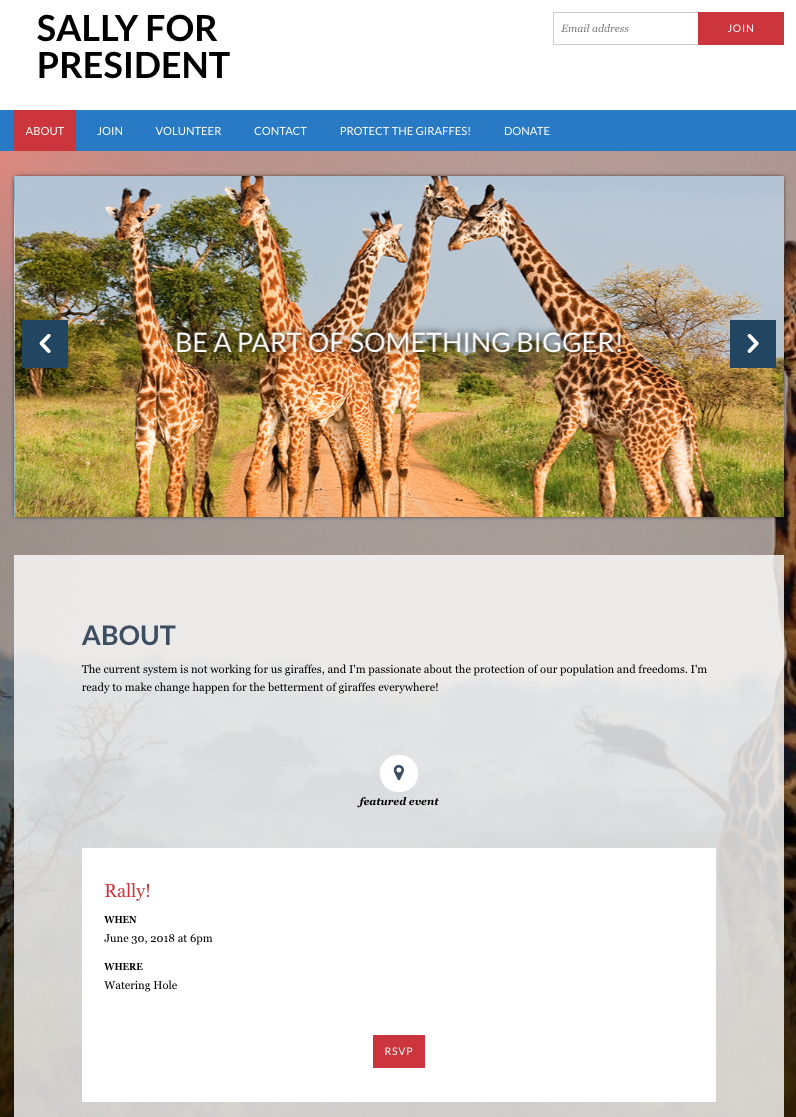
NationBuilder’s mascot, Sally the giraffe, has decided to run for president! So, we set Sally up with a nation, and she’s working to set up her presidential campaign site. She’s designed her site by picking her theme and style, as well as added some of her own images, so now it’s time to get into the meat of the site by customizing her content.
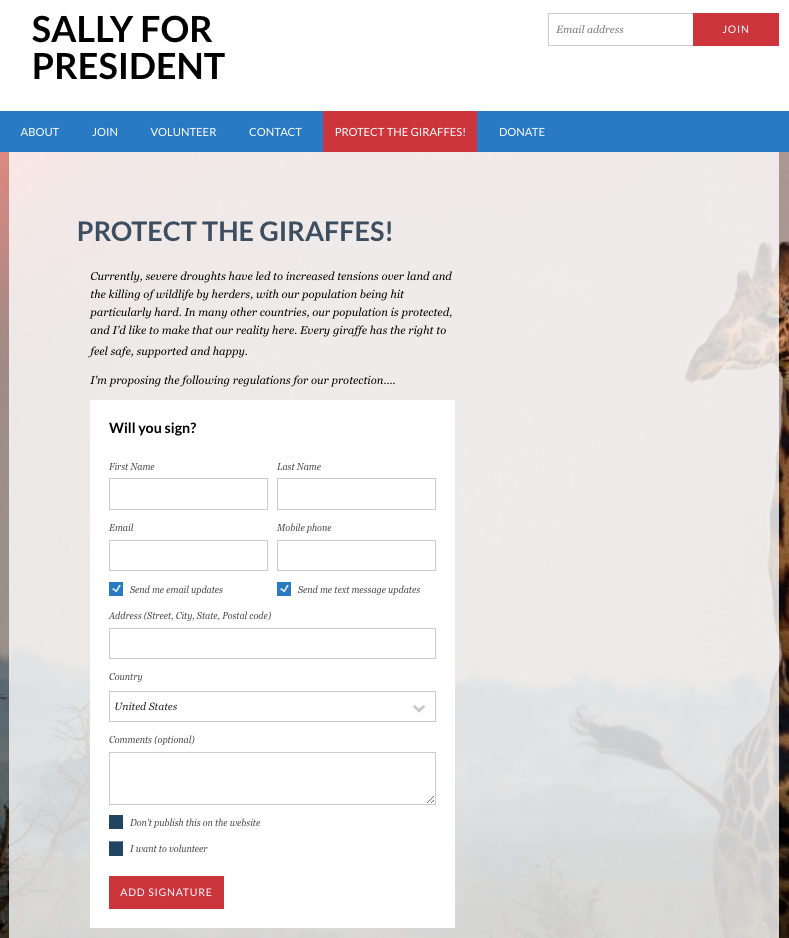
Sally is very passionate about the protection of giraffes, which is the basis of her campaign, and she wants that to come across in a variety of ways on her campaign site.
First, she edits her ‘About’ page to introduce herself to the world and to make sure others know who she is/why she’s running.
To edit your ‘About’ page, navigate to Website > Pages, and click on the Edit button to the left of the page name. You’ll find we’ve provided you with some guidance text to get you started.
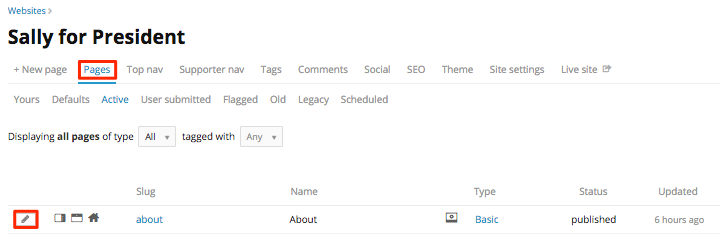

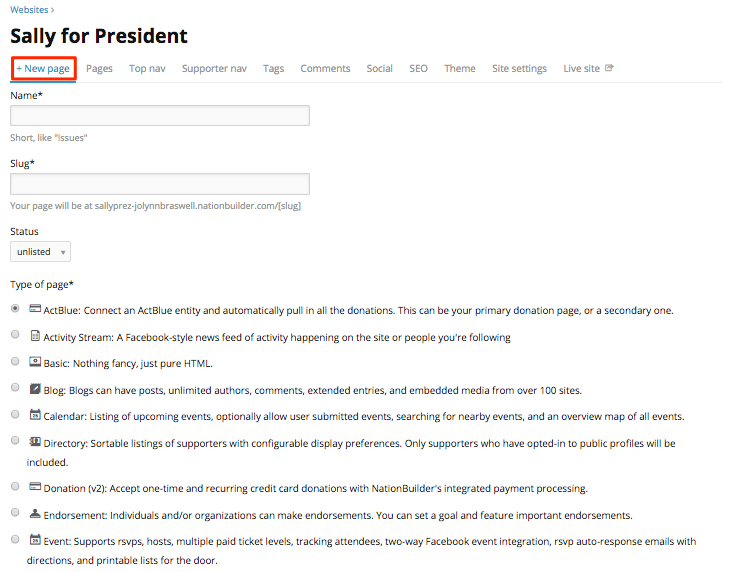
Once you’ve edited your about page, and any other “placeholder” pages you want to customize, you can add additional pages by clicking + New Page. (See #2 for more info on pages!)
A few things to keep in mind when customizing your website:
Content matters more than design
Our placeholder sites have pictures of Martin Luther King rallies and Sequoia National Park, but not of you. You’d be surprised what good pictures of yourself and community, along with a clear communication of your vision, can do to your site. Make sure the images are of high quality and resolution. Here’s how to add images to a page on your site.
Featured content sliders and background images
Once you have solid pictures and have added them to pages, it’s time to make the site really pop. Featured content sliders are a scrolling bar of images that link to other parts of your site on your homepage. They provide a huge visual upgrade without the hassle of coding. You may have noticed them on the demos on NationBuilder’s site.
Featured content sliders can be easily swapped out to reflect the current needs of the campaign. Need more people to read the blog? Create a featured content slider that redirects folks to the newest piece of news. Need to brag about a huge endorsement? Put their logo up on a content slider and redirect to the press release. Featured content sliders live at Website > Pages > Edit page > Settings > Featured content sliders. You can find the best dimensions for featured content sliders on your particular public theme here.


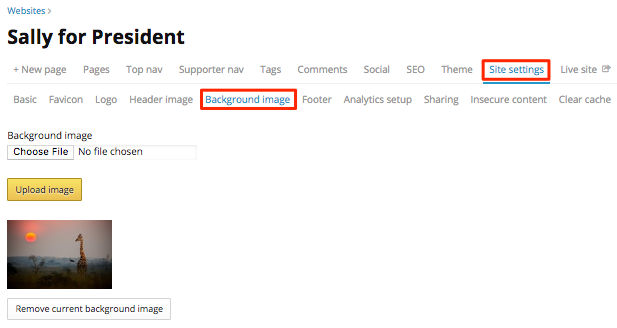
Background images, if done properly, can also dramatically improve the look and feel of your site. Make sure the image itself isn’t too distracting and fits nicely behind your content. When you’ve found the right large, high quality image (Unsplash is a great resource for this!), go to the Website tab in the control panel, click on Site settings and then Background image.
Homepage excerpts
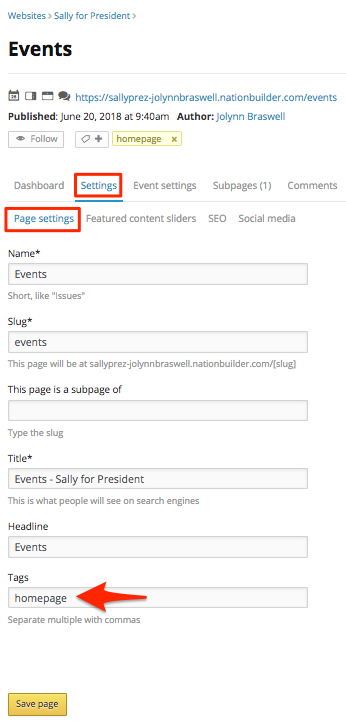
You’ve got a big fundraiser next week and you need more people to buy tickets. You can make any page, like your events calendar, appear on your home page to showcase the latest event. This is another cool visual upgrade that only requires you to tag a page. NationBuilder automatically creates a plug in for the page and displays it on your home page. This can be set by navigating to Website > Pages > Edit page > Settings > Page settings > Tags. Learn more about how to do this here.
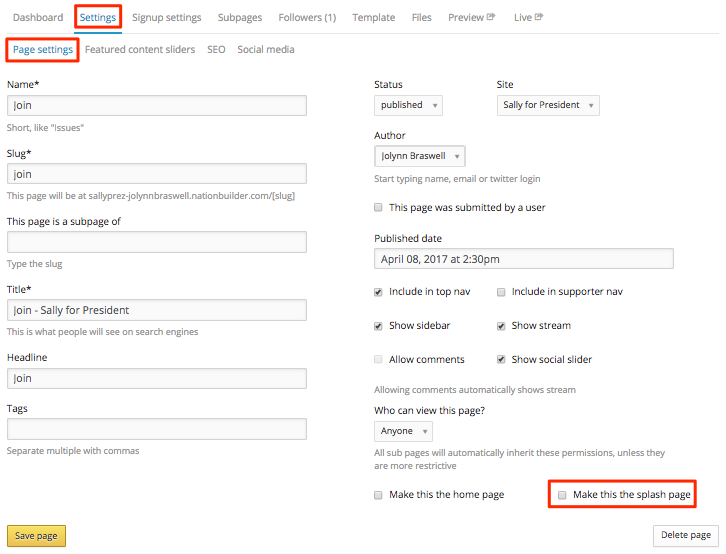
Splash pages
A splash page recognizes a new visitor to your site and displays a unique welcome page that can encourage them to sign up to support the campaign, donate, or RSVP for an event. Like the homepage excerpts, any action page can be turned into a splash page under Settings > Page settings.
Remember, there are plenty of local and state candidates who spent thousands on a beautiful site and still lost. They lost because they didn’t understand that the website is just the first step in a good campaign. What’s behind your website, your data, finances, and communications, is more important than visuals. If there’s one visual change you can’t live without, consider hiring a NationBuilder architect to make small changes to your site. These folks are certified and understand the product. Check out a list of architects here.
2. Call people to action: Create action pages
NationBuilder websites equip you with 30 different action pages. Your call to action can be one central call to action (e.g. “Sign the petition”) or a ladder of engagement that clearly directs visitors from easy to harder steps. You can increase the likelihood that step one leads to step two by creating action chains, social share prompts, and autoresponse emails.
Before her campaign, Sally was circulating a petition, so she’s going to set up an additional page on her site for this. She creates a petition page to house the petition online, which will allow other giraffes to sign it online and allow her to keep track of all of the signers in her nation’s database.
To create additional pages, navigate to Website > Website name > + New Page.
3. Get ready to accept donations: Connect your bank account
Leaders need to be able to raise money--to support their work, grow their memberships, take donations for their campaigns, and sell tickets to their events. Integrated into the platform, and included standard for every NationBuilder customer, is the ability for you to accept payments right in NationBuilder. No more need for a third-party payment processor with monthly fees, complicated set up, or a separate donations system that doesn’t sync with the data in your nation.
Sally also knows it’s important to be ready to accept campaign contributions, so she’s set up integrated payment processing with NationBuilder to make it super-efficient to collect contributions, as well as for her supporters to contribute.
Set up your account so that your donation page can go live:
-
- Go to Settings > Payment processors > Set up a new account.
- Complete the required fields and follow the instructions. Hit the Save button when you are done.
If you are not in the US or Canada, NationBuilder offers integrations with a variety of third-party payment processors.

4. Set up your election
Robust campaign tools are built into your nation. To take full advantage of these features, you'll want to set up your election. To start, you need to input your basic election details. Go to Settings > Political > Elections.
 Enter your next election/contribution limit details. Be sure to click Save election when you're finished. You will then see the election pop up under "Displaying all Election."
Then, navigate to Settings > Political > Settings.
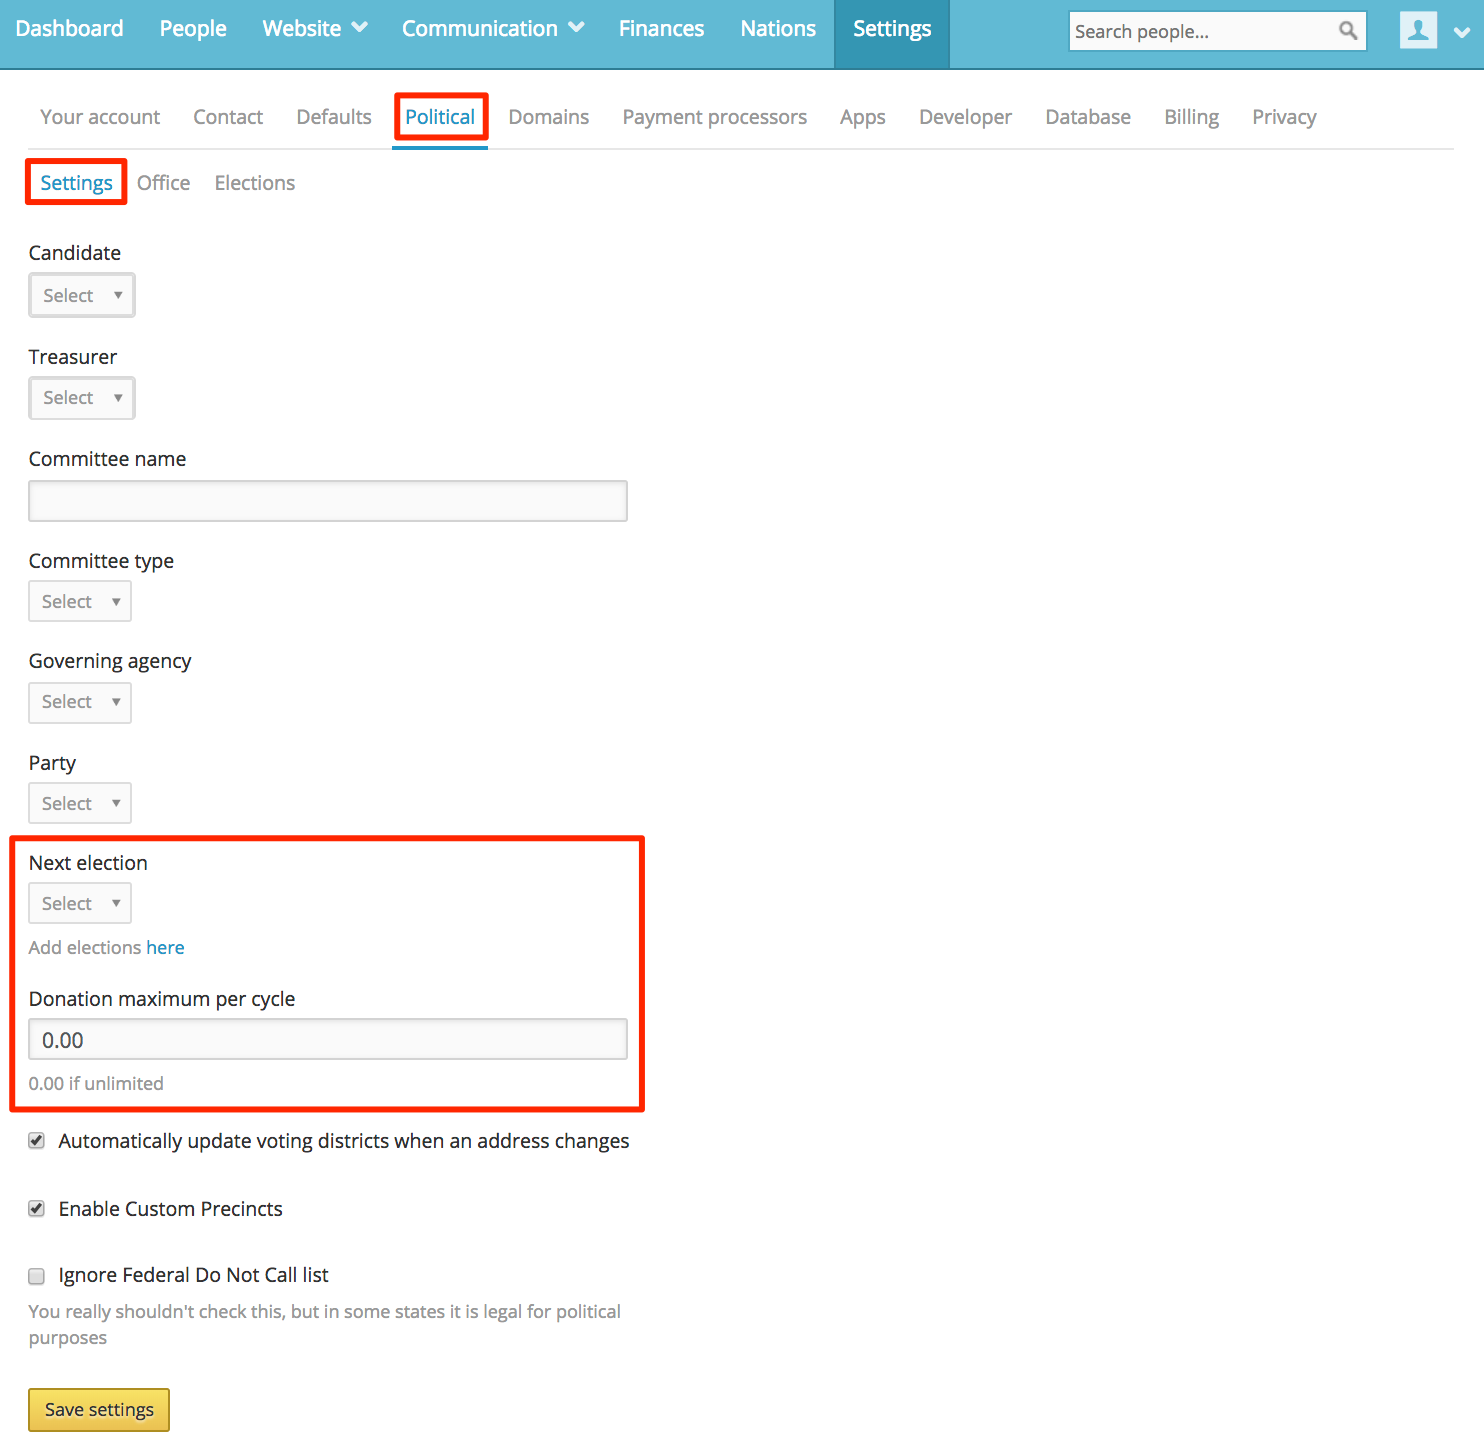
Select the next election, as well as enter the cumulative contribution limit (primary + general). Click Save settings when finished.
5. Build your foundation: Import data
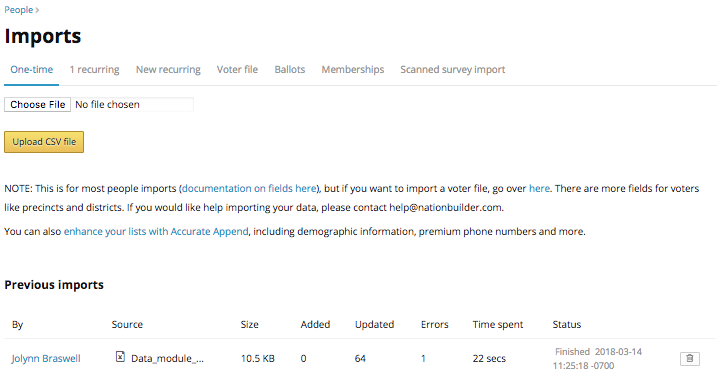
With your site up and running, it’s time to upload voter data into your nation. We provide the voter file from the state government as a foundation for you to get started in your campaigning efforts. However, it is important to understand that the voter file isn’t an easy button either. The data from the state provides people’s names, home addresses, and voter history. This lets you prioritize voters for canvasing and mailers. Your data doesn’t become truly powerful until you begin to collect your own data and add to the state voter file. By recording every door knock, face-to-face interaction, phone call, donation, and social media interaction, and combining it with the state voter file, your data will no longer be a foundation but a key asset to your victory on election day.
Sally has a network of her own already thanks to some previous email lists, which she imports into her nation. However, she would like a voter file to gain access to an even larger network of giraffes to begin outreach to, so she reached out to NB and we sent Sally a voter file for her district. Sally plans to do some turf cutting with this to later use as areas volunteers can canvas.
Here are a few things to note about data:
Request a voter file
Let your organizer know that you would like the voter file for your district and put in a campaign request here.
Email lists
Email addresses are the basic building block of most NationBuilder databases, as they help uniquely-identify your prospects and supporters, serving as anchors for practically every online engagement with your organization.
Time and again, email has been shown to have the highest ROI — upwards of 3800% — of any online communications channel. And the more sources of data you layer onto your email list, the more sophisticated your own targeting and personalization can be:

You can also sync your work email with a personal broadcaster. Doing so will automatically log 1:1 emails on the recipient's profile in NationBuilder, ensuring that if another teammate reaches out, they’ll have valuable context on where that relationship stands.

Possible other sources of email data:
-
- Own an email list of people from a previous digital campaign that might be interested in your new endeavor? Reach out to those prospects. (If they don't bite, simply batch opt them out).
- Migrating off Constant Contact or MailChimp? Tectonica’s free import tools can quickly sync those to your nation.
- Migrating off another 3rd party tool? Email lists are simple to import yourself, or you can send them our way so we can handle it for you!
Offline engagement data
Odds are your team engages supporters offline as well as on. They have calls and one-on-ones with volunteers or possible donors. They organize events where attendees are asked to sign-in. Or maybe they're out collecting signatures on physical petitions.
Whatever offline engagement looks like for you, if that data isn’t in your nation, you run the risk of alienating your top activists. Have you volunteered for a cause you care about, only to later receive a blast from them with no recognition of that contribution? How did that make you feel?
If some of that data is spread across Google Sheets somewhere — don't worry, if you have people’s email addresses in those records, with a little clean-up, you can easily add that vital offline data to supporters’ existing profiles in your nation.
Here are 3 examples:
-
-
Spreadsheet of event attendees + their contact info:
- Export that as a CSV file, upload it to NationBuilder, enter “event-your event-attendee” into a “tag everyone with” field. Everyone imported will get that tag.
-
Spreadsheet of volunteers with columns for each possible volunteer role, and “X/YES” values in cells beneath the roles a volunteer is suited for:
- Find and replace “X” with “volunteer-xyz role” in each column, then map each of those columns to “tag_list.” Cell values will be appended as a tag.
-
Ever organize an event through Eventbrite?
- Use Eventbrite Connect to import up to 4 events and 200 people for free ($25/month to auto-sync all new events).
-
Spreadsheet of event attendees + their contact info:
Financial data
As you know, you can raise money online through NationBuilder. Most organizations will import any past online donations when they first get started on NationBuilder. (If you did not, let us know ASAP.)
Having all your contribution data in NationBuilder empowers you to deliver personalized asks at scale by tailoring the appeal based on recipients' giving history. Why ask these folks to chip in just $8, when you could ask them to match their average gift?

Treat fundraising like a conversation, and your donors will feel seen and appreciated — rather than like your organization's ATM.
Here are 3 sources of financial data you may be missing:
-
- Checks received from major donors— don’t accidentally send someone who just contributed $5,000 a generic fundraising email.
- If you’re tracking major donors in another system, import those donations; moving forward, enter those contributions one-by-one as they come in.
- Are you using a 3rd party tool to sell merch?— You may be interested in Shopify Connect ($25/mo), which can automatically import contacts and their purchase data (with tracking codes) from Shopify. You can also use Ecwid’s shopping cart software whose plans range from free to upwards of $15 per month.
Social media data
Social media data can help you learn about your supporters’ interests and influence.
Shortly after an email enters your database, NationBuilder Match will link corresponding social media accounts along with any info visible to the public — their Twitter bio or LinkedIn headline, profile images, follower counts and more.
You can use that data to find out what a donor cares about before you reach out. Are they a doctor? A space enthusiast? Do they have a massive following they could tap to help amplify your campaign to a wider audience?
Using your data
Once your network and the voter file are in your nation, it’s time to put your data to use:
-
- You can use our turf cutting tool to create walksheets for volunteers to canvass. Navigate to People > Map View > Turf Cut. (More on this below!)

-
- Keep track of donations and export donor history to file campaign expense reports. Navigate to Finances > Export > Export Donations.

-
- Collect social media interactions in real time to see what issues voters are most passionate about. You can even tag people who have liked certain Facebook page posts. Navigate to Communication > Name of Broadcaster > Settings > Facebook.

-
- Use tags, lists, and filters to stay on top of things. Learn about the differences here. These all live within the People tab.

6. Prepare for outreach: Connect your email address/socials and create a phone number
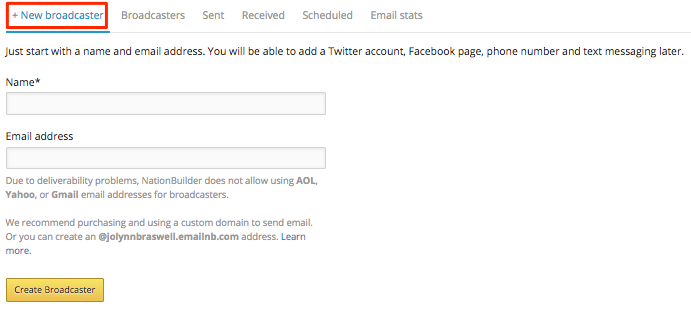
Communication between your organization and your community is consolidated around broadcasters. When you attach an email address to a broadcaster, you can send email blasts to your community. By taking a few extra steps in setting up your broadcaster, you can also accept incoming email for a broadcaster. This will allow recipients to reply to your bulk email.
Now Sally is eager to connect with her supporters. She’s read some of NationBuilder's HowTo's and knows she would benefit greatly by setting up a broadcaster with a phone number for SMS blasts as well as for email correspondence. She also links her social media accounts, so she can post on Facebook or Twitter and track post engagement/tag giraffes who interact with her accounts.
Connect your broadcasters to email addresses to prepare for one-on-one and blast email communication by going to Communication > + Add new Broadcaster.
Also, connect your organization’s Facebook and Twitter accounts to your nation. Go to Communication > Click on the broadcaster > Connect Facebook page/Twitter account. The NationBuilder people database will now record each time people in your database interact with your official social media accounts. This provides you with a wealth of engagement data that’ll become valuable as you move into more targeted outreach. If you’re serious about growing in a targeted manner, create recurring Twitter imports; you’ll be able to find and convert the top followers of any Twitter handle into supporters.

Also, create a phone number and voicemail box to reach out for not only one-on-one communication, but also SMS blasts. Your nation’s phone number is also a great place to track and consolidate incoming calls to your organization. Virtual phone numbers can be particularly useful to keep your personal number private. You can choose to use your virtual phone number as your organization’s primary number, but note that the number cannot be used to make outgoing calls. Navigate to Communication > Click on broadcaster > Settings > Phone.

7. Make outreach easy: Use NationBuilder to help automate the workflow of your campaign
When someone takes the time to sign up to volunteer or donate to your campaign, you want to make sure that person gets the attention they deserve. The last thing you want is an email asking for money to go to a donor who just donated hundreds to the campaign. Keeping track of your relationships is important and the best way to do that is by managing your workflow in NationBuilder. Learn more about workflows here.
Ideally, when a volunteer signs up for your campaign or a person decides to donate, a few of things will happen:
-
- They will get auto tagged. This gives them a label for easy sorting later.
Sally would like to keep track of all the giraffes who sign her petition, this way she can find them and reach out to them later to solicit further support. So, she sets up her petition page to tag all signers with ‘protection-petition’.
You’ll find the ability to set auto tags by navigating to Website > Website name > Edit (next to page you wish to add auto tags to) > [Page type] Settings > Advanced.
- They will get auto tagged. This gives them a label for easy sorting later.
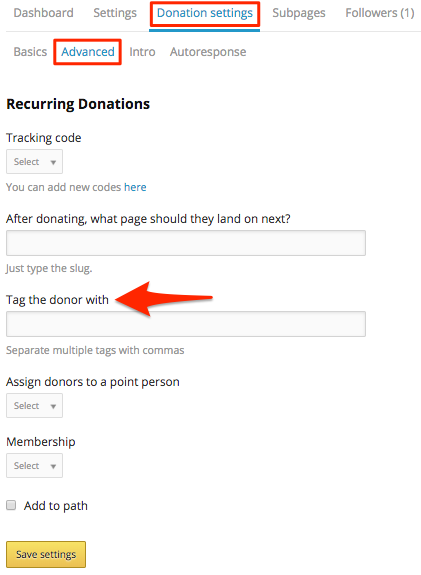
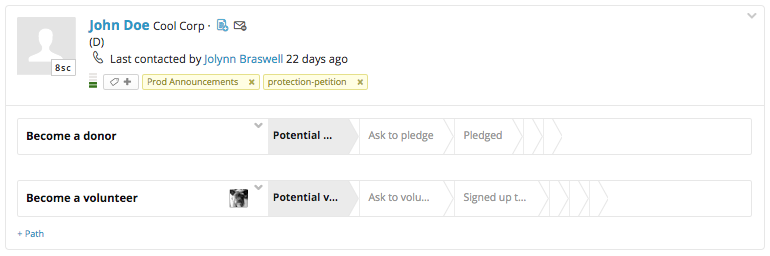
2. They will be added to a path. A path is a step-by-step workflow that describes how people taking action contribute toward achieving the larger goal. As a person completes various steps, they are moved along the path to its completion. This deliberate distribution of work provides clarity on how individual support helps achieve the organization's mission. Paths are the cornerstone to building internal alignment and accountability.
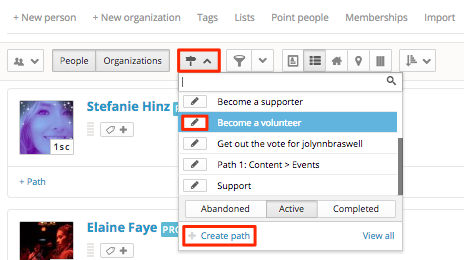
Sally also wants to add petition signers to a path, that way she can use this simple workflow to move these giraffes toward supporting her larger campaign to become president by donating or volunteering. Sally decides to edit the default path ‘Become a volunteer’ to include the steps she plans to take to make giraffes volunteers.
To create/edit paths, go to People > click the Path button > + Create path OR click the Edit button next to a path.
3. They will be assigned to a point person. This person is responsible for ensuring the volunteer/donor follows up on their promise.
Next, Sally is going to assign a point person to the petition page who will be in charge of outreach involving the giraffes who end up on this path.
To assign a point person go to Website > Website name > Edit (next to page you wish to add a point person to) > [Page type] Settings > Basics.

8. Build your community: Phone banking and turf cutting for canvassing
Setting up a phone bank run by volunteers and staffers can be a vital tool for getting your community to take action. Whether it’s a follow-up to direct mail, a fundraising drive, or a GOTV operation, a phone bank can help you connect to your community using genuine 1-on-1 conversations.
Sally wants to set up a phone bank fundraising drive. She decides she wants to reach out to all recent recipients of her fundraising email blast to solicit their donation.
First, she searches her database for anyone who has opted to volunteer by filtering for the ‘volunteer’ tag. She contacts them all to see if they are willing to take on a list of giraffes to call, and the ones who agree are given limited control panel access so they can see their call list.
Next, she creates a list of all the giraffes she would like to reach out to and splits it between the volunteers. Now her team is ready to connect with the community one-on-one.
Phone banking
Set your goal
The first step in setting up a phone bank is determining your goal: who do you want to call and what do you want them to do? Are you calling the recent recipients of an important fundraising email to remind them to give? Are you calling warm prospects from a voter file as part of a GOTV operation? No matter your goal, make sure you have a clear ask and are targeting the right people for that ask. Determining this will allow you to create lists of people whom you want to target with your phone bank.
Use tags to organize volunteers
Now that your goal is set, you need to determine who will staff the phones. You can filter your database for volunteers who have been at your recent events to find people who would be likely to be a phone banker. Then, you can contact these people directly to make the ask.
If you don’t have enough volunteers, you can set up a new action page to recruit new volunteers for the phone bank. Set a volunteer role to “phone banker,” and then send out an email or social media update to ask your community to volunteer.
Splitting lists between phone bankers
Once you’ve created a list of people you want to call, you can split your call list into the number of phone bank volunteers you have. Then, give each phone banker control panel access (make sure to give them appropriate permission settings so they cannot alter other parts of your nation). Once this is done, navigate to the list you wish to assign by clicking the edit button on the list dropdown menu. Then, click on Settings. Here, you can specify who to share the list with, how to describe the list, and whether or not somebody can change the list. Even if you do not select “let people you share this list with change it,” the control panel user will still be able to log contacts.
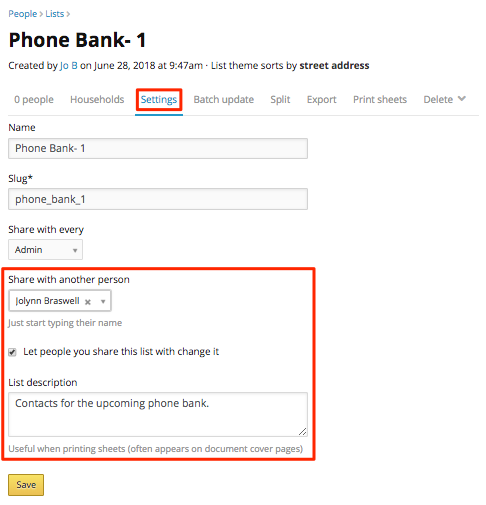
Once you complete this process for each volunteer, your phone bankers can sign in to the control panel and pull up the list assigned to them. Be careful not to share the same list with more than one volunteer, or an entire permission set, to avoid multiple calls to the same people.
For more information on phone banking, click here and here.
Canvassing
Knocking on doors and speaking to voters is an essential part of any successful election campaign. At NationBuilder, we’ve developed tools to help you do that. These work with your people database, so that you can take what you find on the doorsteps directly into your digital campaign work.
Though talking to people on the doorstep is by no means the sole preserve of political campaigners, and can be helpful for all sorts of groups, from community campaigning to local businesses.
There are two main ways to go canvassing with your NationBuilder data - by printing walk sheets or using a mobile app.
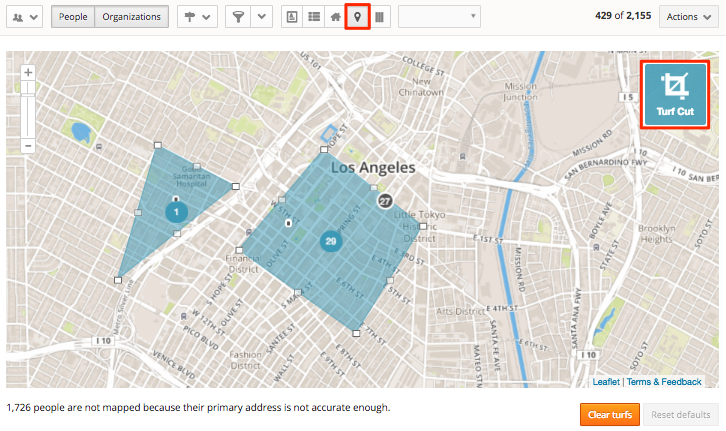
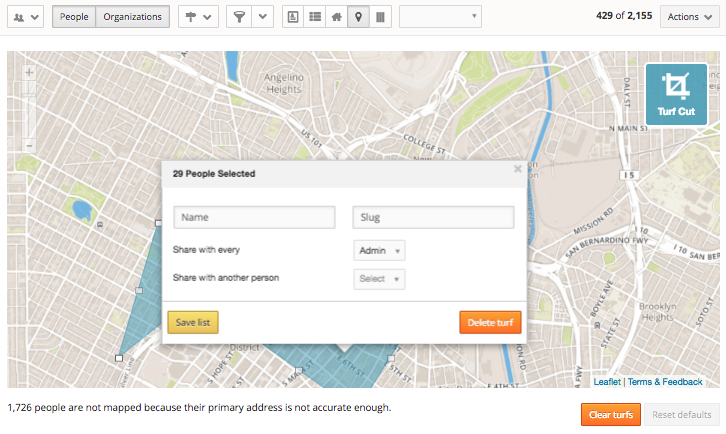
In either case, the first step is to choose who you are going to speak to. You can use the turf cutter to select the people you are going to speak to. Turf cutting is the process of defining customized boundaries on a map. Once you cut turf, you can select the people within the turf and save them to a list. This process makes canvassing and phone banking much more manageable.
Sally wants to make sure her team gets some face time with the community to help build support. So, she decides to use the turf cut tool to create walk sheets for volunteers.
To cut turf go to People > click on map view > Turf Cut > and click and drag on the map to create turf, you can then click within the turf to create a list of people in it to share with your teammates/volunteers.
Using canvassing data
The data you get from canvassing can be used to more effectively filter and target your email blasts. Use the data you have to tailor your message and your ask.
For example, if a voter has said they are definitely going to vote for you, make sure your emails thank them for their support. You can also then ask them to do something further, like display a poster or ask a friend to support your candidate. For people who are undecided, you can send emails where the message is tailored to persuade them to support you.

9. Continue to build your community: Find your leaders
To rapidly grow, you can’t do it alone. NationBuilder makes it easy to instantly find your champions (people who care most about what you’re doing and are highly engaged as a result) and influencers (people who have large social followings). Tag these people or save them to a list; they’re the leaders who will propel your growth.
Lastly, Sally wants to be able to identify giraffes that are the champions for her campaign as she really wants to work with these folks to build a solid community and incentivize progress with rewards, so she decides to create a leaderboard for her ‘Superstars.’
To build a leaderboard, navigate to People > More > Leaderboards > New leaderboard.

By using leaderboards, you can more quickly identify who the biggest influencers are in your community.

Distribute ownership
Since you already know how deeply people are engaged with your campaign, you can invite leaders in smaller cohorts or on a 1:1 basis to help grow your digital campaign in specific ways -- as volunteer recruiters, fundraisers, or social media ambassadors. Equip them with personal pages that contain recruiter links for peer-to-peer engagement.
Incentivize and track progress
Customize your social capital system and link it (or other metrics) to leaderboards. In addition to providing a quick way to monitor progress, these “gamifying” features activate peer effects, which you can consider bolstering with real world rewards and recognition.
10. Go above and beyond: Deepen your community
Invest in two powerful ways to bring your community closer -- storytelling and face-to-face events. By learning to effectively communicate our individual and team stories, community members increasingly aligned around shared goals and values. Many successful digital campaigns incorporate user-submitted events into their overall strategy because they are a high-value expression of grassroots ownership.
Related resources
Configure featured content sliders
How to accept payments with NationBuilder
Connecting a third-party payment processor
How to connect Facebook and Twitter to a broadcaster
Create a phone number and access voicemail
How to create and move people along paths
When to use filters vs. lists vs. tags
How to create and publish leaderboards
Understanding virtual currency